

I was chatting with some of the guys about taking pictures of action figures – a hobby near and dear to my heart, in case you hadn’t noticed. We got onto the subject of backgrounds. I’ve used plain dark backgrounds for dramatic lighting and plain light backgrounds to highlight the figures. And there’s guys like Sandman, who build elaborate sets for his photo shoots – see Sandman’s recent pictorial reviews for some mind-blowing shots.
There’s another type of background – the photo backdrop. A simple photo backdrop can provide the effect of a three-dimensional environment without having to build one. That’s the subject of this how-to article.
What you’ll need:
- A photo that includes a portion of the ground or floor
- Photo editing software, like Photoshop or Gimp
- A color printer
- Cardboard
- Tape
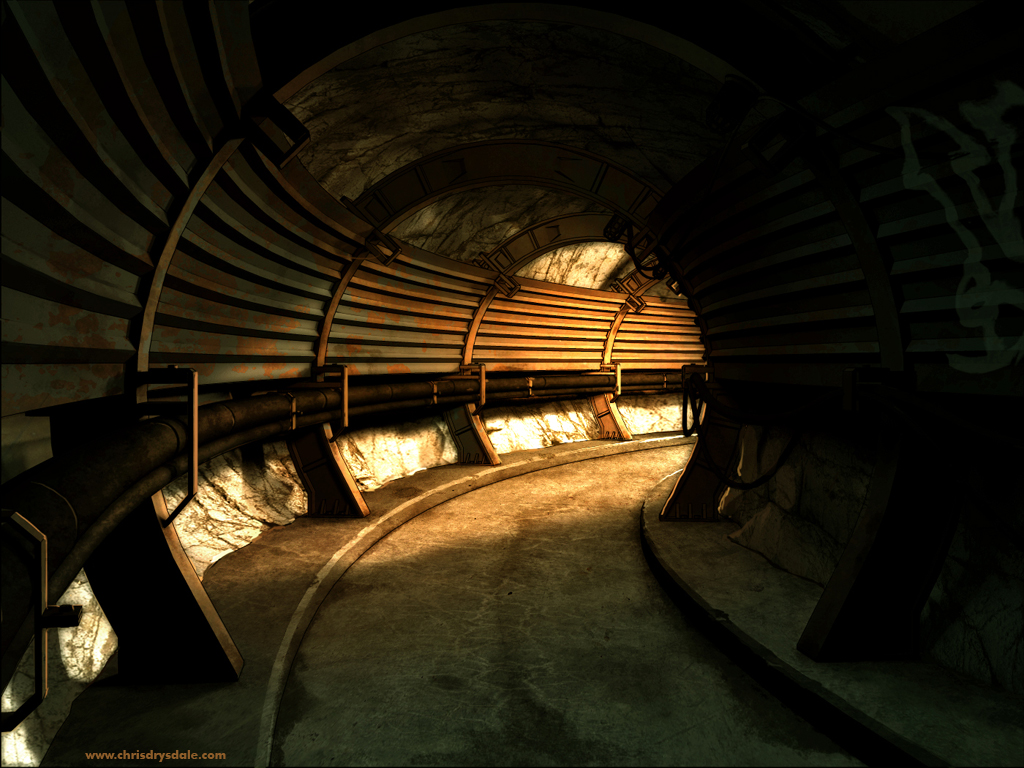
To start us off, we want to find a suitable picture to use as the basis for our background. For this one I did an online image search for “sewer tunnels” and came across this image by designer Chris Drysdale. I didn’t ask for permission to use the image, so I hope Chris doesn’t mind. What makes this picture work is that it’s got an interesting background, but it also includes some of the sewer tunnel floor in the foreground. To create the 3D effect, we need some of that ground showing.
 Original.jpg")
 floor highlighted.jpg")
 floor stretched.jpg")
First, in the leftmost picture, I cropped the image to keep the portion of it I want to use as the backdrop. There were some additional supports that continued on the left side that I thought might look odd on the part of the image I want to use as the “floor,” so I cut those out.
I show in the middle picture the area of the shot I am using for the “floor” in red. A general rule of thumb that I’ve found to work is that you want the “floor” to consist of about the bottom third of the overall background.
The picture on the right shows the image after I used the photo editing software to stretch out the “floor” – since the “floor” is going to be perpendicular to the background portion of the picture, by stretching it out you will be using perspective to create the illusion of a continuous background. It’s like recreating the third dimension from the 2D image you started with.
To make this easier to print, I set the image size to be 8 1/2 by 11-inches (letter size) in landscape mode, and then double the canvas height. The background portion (the part not shaded red above) is what I put into the top half of the image, then I stretch out the “floor” portion to fill the bottom half of the image. Then I split the two halves and print each onto a letter-sized page.

After you print out the top and bottom halves, it’s onto assembly. First, trim the white borders off the edges where the backdrop will come together. Then tape the two halves together on the blank backside.
Cut some cardboard backing – this can be either two pieces you can tape together or a single piece you can fold. Then tape your printed images onto the cardboard. You will probably need something to prop up the back of your backdrop – I just use whatever carded figure I have sitting around from that pile of unopened figures that my wife hates. And that’s it – you’re ready to add some figures and take pictures.
Here’s some more shots using this backdrop. Now go make one of your own and send me some pictures!


Very cool. 🙂
that is so cool! you can’t even tell where the 2 parts are joined!
Very cool indeed. How do you know how much to stretch the ‘floor’ portion? Do you just eyeball it?
thanks guys! I just eyeballed the “floor” but I’m guessing that you want to fill up about a third or half of the bottom frame before you stretch it out.
I’ve used photo backdrops for my own pics before, but it never occurred to me to distort the ground like that. FANTASTIC idea, Ron! This has such a brilliant effect.
Thanks for sharing the tips! Really love how this turned out…
I think I got it now. The red section is what gets stretched and when you print it, it’s also the second piece of paper. The two parts join at the bend of the paper. It looks so seamless. So are you using just regular paper for this?
Excellent article! I’ll be sure to use it soon in my pics. Thanks for breaking it down so short and succintly, 🙂
I’d been experimenting with stuff like this after getting one of the AFD displays, but none of my methods were quite so simple and easily explained as this. Thanks so much!
Do you think it’d work better with matte photo paper? I’m tempted to buy some…
Great, and simple way to make your own photo backdrop, it looks pretty simple when you put it that way.
yeah, I’m using regular uncoated paper. my wife knows a lot about print publishing, so I asked her about different papers. I got a fair amount of glare in the top corners of the pictures (you can see it best in the Ghostbusters pic), so I was curious if a matte coated paper would help reduce that.
she told me that it would not – the glare is being reflected by the ink that’s fused with the paper, so since there’s a lot of ink in the dark areas of the background, the ink would cover up the matte coating on the paper, and negate its effects.
Beautifully done, Ron!
I usually just take pics of my toys using a laptop or an LCD monitor whenever I need back-drops, but printing it out and stretching the floor for the perspective distortion is sheer genius!
With regards to the “glare”, they looked like steam coming from the pipes for me before you mentioned that they were what they were.
Fantastic!!!
This is almost how i made my JSA brownstone photo backdrop!
@Ron: Ahh, I see. Did your wife have any other suggestions on that front, or is glare inevitable here?
@Wes, she said to try diffusing the light a bit more. I already use a photo cube, so I’ve experimented with positioning my lights (I have two, one on each side of the cube) so they’re not directly shining on the backdrop. with the lights near the rear of the photo cube pointing towards the top front center of the cube, there’s been virtually no glare on the backdrop, and the lighting works better considering the “light at the end of the tunnel.” 😀
@Ron: Much appreciated! Another question: are these the images you actually used, or did you resize them for the purposes of the article? It looks like the image you’ve shared comes to 3.96 x 6.12 at 200 dpi — but if one can print with those specs and still have the printout look as beautiful as yours does, I’d rather save the space and RAM and work with a smaller file than the gargantuan canvas I’m working with now. 🙂
@Wes, the image was saved as a jpg from the original photoshop file, which was set at 11 x 17 inches at 72 dpi. I imagine you can still print from that image resized to two 8.5 x 11 letter-sized pages or one 11 x 17 tabloid page. if I could print bigger pages I would.
Very cool. I have a question, though. I am trying to print this image, but am having trouble printing as two pages. How do you go from the one page to two?
Also, how did you stretch the original image in photoshop?
@Zach – in photoshop, to print the image on two pages you want to split it into two images. change the canvas size to 50% height and use the arrows to show the top half, then print. undo the canvas size change and then redo it, this time showing the bottom half.
to stretch a portion of an image, first use the rectangular selection to select the portion you want to stretch. then transform the selection and stretch as needed. hope that helps.
Worked like a charm! Thanks, Ron!
Hi, very impressed with the create your own backdrop, it blends in perfectly with the figure. I was wondering how the greyed out background was created in some of the other photo’s, if you could let me know I would very much appreciate it.
Thanks for this tutorial.
Need to stretch out pics for what I want.
Need to have stuff on a grander scale. LOL
WOW! thanks for this post. This is exactly what I was looking for. Great idea and super easy. your pics look dope. Hopefully I will have similar success. FYI. get your pics where you want em faster using #eyefi card.